Thursday, 12 December 2013

Super Easy Holiday Spice Balls


Last night I hosted my very first ever, holiday themed wellness seminar. I had such a blast sharing my favourite holiday goodies - all gluten free and vegan and as healthy as can be. I couldn't wait to share this recipe for these easy-peasy holiday spice bites.

The recipe is super flexible, and you can basically use whatever dried fruit and nuts you have on hand. Be warned, however, that different nuts will provide different results due to their fat content.

Holiday Spice Balls


Makes 12-14 tbsp sized balls

Ingredients

1 cup raw almonds, cashews or walnuts
1 cup pitted dates or dried apricots
1 tbsp raw cacao powder
½ tsp cinnamon
pinch of sea salt
½ tsp peppermint, vanilla, or other extract (optional)
Toppings: raw cacao powder, ground almonds, cinnamon, etc. (optional)


Directions

  1. Combine all ingredients, except toppings (if using) in a food processor or high speed blender
  2. Roll into tablespoon sized balls between clean hands
  3. Lightly roll balls in topping of your choice, if using


Notes

This recipe is very flexible. Feel free to experiment with different nuts, spices, and toppings!

Use caution if using nuts with a high fat content (e.g cashews, pecans). The longer the ingredients mix, the more oil is released, and the result may be softer than desired.

Wet hands before rolling into balls to prevent sticking.

Raw cacao powder can be found in most health food stores and is an amazing superfood packed with antioxidants.

Regular cocoa powder will work fine for this recipe if you don’t have raw cacao on hand. Carob powder would also substitute well for those sensitive to chocolate.


This recipe was inspired by fellow holistic health coach Kasey J. Smith.

Saturday, 30 November 2013

Spiced Apple Breakfast Bowl


Breakfast is by far one of my favourite meals of the day. What we fuel our bodies with in the morning sets the tone for the rest of our day. This breakfast bowl has been one of my go-to recipes lately. It has the perfect blend of seasonal spices, and with lots of healthy carbs and good fats, it's perfect for days where you need a little extra fuel to last you through the morning.

Spiced Apple Breakfast Bowl


Ingredients

1/4 cup oats
2 tbsp chia seeds
1/4 tsp cinnamon
1/4 tsp nutmeg
1/4 tsp ground ginger
1 cup non-dairy milk (hemp, rice, almond, etc.)
1 medium apple
2 tbsp raisins
2 tbsp chopped walnuts or pecans
1 tbsp shredded coconut
drizzle of maple syrup (optional)

Directions

Mix oats, chia seeds, spices and milk in a small bowl, and let sit about 5 minutes for the chia seeds to expand and absorb some of the liquid.

While waiting, chop apple into bite sized pieces.

Once oat mixture has slightly thickened, top with remaining ingredients.

Dig in, and enjoy!

Friday, 22 November 2013

This All Natural Hot Chocolate Will Blow You Away!


If you've been following me for a while, you'll know that I love chocolate. Remember my post a while back about raw chocolate?

Well - things just got real.

Now that the winter months are upon us - at least here in Calgary - I've been craving all sorts of warm, delicious (yet healthy) treats. Once I discovered this decadent hot chocolate, I knew I'd hit the jackpot. The best part is that all of the ingredients are REAL! That's usually enough for me right there, but it's also super easy to make, and so deliciously creamy and delicious.

All you'll need to make this are a few simple ingredients that you may already have, and a blender! I used my vitamix, but any high speed blender would work.

All Natural Hot Chocolate

serves 2

Ingredients

3 cups hot water
6 dates, pitted
1/4 cup raw cashews
2 tbsp raw cacao powder (see notes)
1/4 tsp cinnamon
pinch of cayenne (optional)

Directions

Combine ingredients into high speed blender, mix on high for 30-40 seconds.
Serve warm in your best mugs and enjoy with someone special.


Notes

If you don't have raw cacao powder on hand, I highly recommend you head out to the closest natural foods store and get some. It's unbelievably high in antioxidants, and is the purest form of chocolate - what all the candy bar chocolate originally came from. If this is not an option for you, for whatever reason, regular cocoa powder that you would use to bake with would work just fine.


Friday, 15 November 2013

Gluten Free Holiday Recipe Guide


My first gluten free Christmas was only a few short years ago, and I remember spending hours online searching for recipes that would come close to the real deal that I'd be "missing out on". Looking back, I wish I'd had the resources that are available to me now (I hadn't even heard of Pinterest back then).

Fast forward a couple years, and I'm now on my way to becoming established as a Health Coach, ready to take on the world and help clients achieve their goals of health, fitness, weight loss, vitality (you name it). The things I've learned and the people I've met along the way inspire me everyday. I am truly blessed to be on this path, helping others while always learning - and trying out - new things myself.

That's why I want to share this Gluten Free Holiday Recipe Guide, with 24 delicious gluten free recipes all written by my peers, fellow Health Coaches and graduates from Integrative Nutrition. This is sure to make your life a bit easier as you search for the perfect recipes to add to your holiday menus this year.

To download your copy of the Holiday Recipe Guide, click HERE.


Sunday, 10 November 2013

Curried Chickpea Hummus


I was recently inspired by a container of store bought curried hummus that didn't last very long before I polished it off all by myself. I'd never even imagined this particular flavour combination, and I was pleasantly surprised by it's deliciousness. I thought, instead of paying $4+ for a small container of the stuff, why not recreate it at home with real ingredients?

This hummus is so delicious, and since you're making it yourself you have control over exactly what goes into it. Perfect for someone who may not be sold on the whole curry flavour in a hummus (I assure you, it's surprisingly delicious). Full of healthy fats, fibre - and in this case, immune boosting turmeric - this versatile dip is not only tasty but oh so good for you too!

Here's the recipe:

Curried Chickpea Hummus


Ingredients

1 tbsp coconut oil
½ small yellow onion, diced
1 tsp curry powder
½ tsp turmeric
½ tsp cumin
¼ cup filtered water
2 cups cooked chickpeas (or 1 15 oz can)
1-2 tbsp olive oil
¼ cup tahini
1 tsp raw honey
2 cloves garlic
½ lemon, juiced
¼ tsp good quality salt


Directions

Melt coconut oil in a frying pan on medium heat.
Cook onions until soft, about 3-5 mins, stirring often.
Add curry powder, turmeric, cumin and cook for another minute.
Add water to pan and stir until water is mostly evaporated, about 5-8 mins


Not the prettiest picture, but here's
what the curried onions should look like when done

Combine all ingredients (including curried onions) to a food processor, and blend on high until smooth.

Serve with veggies, crackers, in a wrap or however you choose!


Notes

  • Turmeric is powerful, in more ways than one! If you use wooden or plastic utensils like I did, make sure you wash them as soon as possible. If not, you might have to put up with a yellow tinge on your kitchen tools from the brightly hued spice.

  • Why the two oils? I cooked the onions with coconut oil instead of the olive oil that is called for later in the recipe because coconut oil is a much more heat-stable oil to cook with, meaning it isn't as easily denatured compared to other oils, such as olive oil. This denaturing can be very bad for your health, with some people believing such oils become carcinogenic (cancer causing) when they are heated. Olive oil is best enjoyed in it's natural state, and can provide some great health benefits if it remains this way. On that note, when choosing your olive oil, make sure you opt for one that has been cold pressed in the manufacturing process. Otherwise, it will likely have been heated (and therefore denatured) before it even gets to your kitchen.


Thursday, 31 October 2013

Spooky Black Rice with Carrots and Roasted Acorn Squash


HAPPY HALLOWEEN!

In amidst of all the halloween parties, trick-or-treat candies and other indulgences that go along with the holiday, it's nice to know that there are festive recipes out there that are good for you too! This seasonal black and orange dish definitely hits the spot on a cool fall evening, and would be an excellent addition to just about any meal. To top it off, black rice is extremely nutritious - full of antioxidants, fibre and vitamin E. I stumbled upon this website while writing this post - check it out if you're looking for more info or articles about this new superfood. With that said, if you aren't able to get your hands on some black rice and want to give this recipe a shot, any rice would work just fine.

Spooky Black Rice with Carrots and Roasted Acorn Squash

Ingredients

1 cup black rice, cooked
2 cups water or broth (I used homemade bone broth)
1 acorn squash, peeled, seeded and cubed
4 carrots, chopped (peel if not organic)
1 tbsp olive oil
1 tsp dried thyme (or 1 tbsp fresh)
1 tsp dried oregano
1/2 cup raw pecans
1-2 large handfuls of arugula
salt & pepper to taste

Directions

Black rice should ideally be soaked for about an hour prior to rinsing and cooking. If you're pressed for time, make sure you give the rice a good rinse until the water runs clear. Bring rice and water/broth to a boil, reduce heat, cover, and let simmer for 25-30 mins if soaked, or 60-70 if unsoaked.

While rice is cooking, preheat oven to 450 F.
Prepare the squash and carrots, and once chopped to your liking, toss in olive oil and herbs until coated. Place on a baking sheet and roast for about 15 minutes. Remove pan, turn veg, and place back in the oven for another 10-12 minutes until fork tender (it's ok if the squash is slightly blackened). In the last few minutes, toss pecans onto the baking sheet to lightly toast.

Remove from oven, combine with cooked rice and arugula.
Season with salt and pepper, if using, and enjoy!


Hope you all enjoy the halloween festivities you have planned tonight! Don't forget to eat a delicious, satisfying dinner before handing out candies to the trick-or-treaters tonight to avoid temptation.

Thursday, 17 October 2013

Bikram Yoga Do's and Don'ts


I've been doing a lot of reading about Bikram Yoga and other people's take on the proverbial (and sometimes literal) torture chamber lately. There were two articles I recently came across detailing the Do's and Don'ts of your Bikram Yoga class and I wanted to put my own spin on it.

Here are my own top 5 Do's and Don'ts for your Bikram Yoga practice:

Do's

  1. Do... Take the time before class to quiet your mind so you’re better able to listen to the dialogue. Everything you’ve ever wondered about the practice, the postures, the breathing, everything – it’s all in the dialogue. There are still classes after 8 years of practicing (and having the dialogue so ingrained in my mind I could – and sometimes do – recite it in my sleep) where I will hear something in a new way and it just clicks and makes sense in my body, deepening my practice and my understanding of the posture. It’s only possible to get to that level when you’re able to quiet your own internal dialogue and be present and receptive to what the teacher has to say.
  2. Do... Have everything you need at your mat before class starts. Ok, for your first few classes this might not apply, but if you are a Queen (or King) of Kleenex and have a habit of walking to the front of the room for a tissue during party time, plan ahead! Grab a couple before class and keep them within reach. This will limit the amount of excess movement during class, which will save you energy and not distract your fellow students or teacher!
  3. Do...Stay in the room. Even if you’re having the hottest, most difficult class of your life, the best thing you can do for yourself is to just take it easy. Kneel down, lie down, do whatever you need to do, but stay in the room! The teacher won’t call you out for sitting out a posture or two, but they will if you bolt for the door. The change in temperature can be a big shock for your system, so just accept that once class starts, you’re in there until the end. Trust me, it’s possible even through the hottest classes – I’ve yet to leave the room during class and I’m still here to write about it.
  4. Do... Move together. Whether you believe it or not, your neighbours in the room have a big influence on your class. It’s important to support one another by engaging in the collective energy and moving in and out of postures together, sharing energy and strength throughout the class. Pay attention to if you are consistently the last person to grab your foot in standing head to knee or raise your arms over your head for triangle. If so, try to break these habits and in turn inspire your fellow yogis.
  5. Do... Set mini goals for yourself. There are always things to work towards in yoga, and it’s not just about having the perfect postures. Having small goals in class will help to keep you accountable during your time in the hot room. Maybe it’s to avoid wiping your sweat (see below), to stay in the room, or to touch your forehead to your knee. Whatever it is, small, achievable goals will hold you accountable while deepening your practice. 

Don’ts

  1. Don't... Take yourself so seriously! It’s just yoga, no need to make that angry face at yourself in the mirror. Sometimes we don’t even realize the faces we make in the room until someone calls us out on it. One of my current struggles is to SMILE, especially during Standing Bow. All my energy is concentrated on the kick, the reach, the balance – none of it can be spared for a smile. Or so it seemed. Once I started to practice smiling in the posture everything felt a lot lighter, and a lot less frustrating if I lost my balance or fell out of the posture. I really believe that if we take our practice less seriously, we will take ourselves less seriously outside of the hot room. How we approach our practice is how we approach our lives.
  2. Don't... Wipe your sweat! I get it, sometimes sweat gets uncomfortable, especially when we’re not used to sweating as profusely as you do in a Bikram Yoga class. Sweat is the body’s natural air conditioning system, working to cool the body down. When we wipe the sweat off our skin, we’re taking away that cooling system and our body will naturally begin to warm up even more. On top of that, even more energy is expended working to get that sweat back to the skin. In short, every time you wipe your sweat, you are going to feel hotter and hotter. 
  3. Don't... Come to class on a full stomach. Just like the advice not to swim after eating, it’s important not to avoid eating prior to practicing yoga. Not only is it going to be seriously uncomfortable to practice if you’ve recently eaten, it’s going to feel a lot more difficult that normal. When the body is busy digesting, blood flow is directed away from the muscles to the digestive system. What happens when these two areas of the body are competing for blood? Neither systems end up with enough oxygen and you may begin to feel weak and even light headed. Not fun. 
  4. Don't... Chug your water. This is definitely something I have a hard time with. It’s not easy to stop chugging your cool, refreshing water once you start! It turns out that the water you drink during class doesn’t actually do much in the way of hydration – that has to happen before class. On top of that, any cold water we drink in class has to be brought back to normal body temperature, which takes energy away from where you need it the most.
  5. Don't... Let your thoughts take over. When you’re lying in Savasana, it’s normal for thoughts to pop into your mind. The key is to acknowledge them, and then send the on their way. If you’re coming to yoga right after a busy day at work, do your best to let all of that go at the door (or preferably, at the office). Any planning, list making or problem solving can be done after class. Your time in the room is to focus on yourself, and nothing else.

Thursday, 10 October 2013

Thanksgiving Menu Inspiration


Can you believe that Thanksgiving is right around the corner?  As much as I’ve been embracing fall this year, it has definitely caught me off guard! Often the holidays – especially ones like thanksgiving that are centered around feasts – can provide the perfect opportunity to overdo it and begin down the slippery slope that usually ends in lofty new years resolutions.

I’m not saying to give up you favourite holiday treats, but be mindful about what (and how much) you’re eating. There are healthy options all around us, sometimes it just takes a bit of thought and planning.

Often it’s the thought and planning that take the most effort, so let me take care of that for you! Here are a few recipes I’m thinking about incorporating into my family’s Thanksgiving dinner.  I can’t take any responsibility for how they turn out, but if nothing else, here's some Thanksgiving menu inspiration:


Vegan Gluten Free Pumpkin Pie


Happy cooking (and feasting!) Hope you all have a wonderful thanksgiving filled with lots of love and gratitude.


Saturday, 5 October 2013

Pumpkin Oatmeal Chocolate Chip Cookies


I was going to wait until next week to share this recipe with you, but I couldn't keep these cookies a secret so I just had to post it tonight. That and I'm procrastinating packing and cleaning my house before people come to see it in a couple days (we're moving to another part of the city).

These were a bit of an experiment to start, taking inspiration from this recipe and making them completely vegan, gluten free and refined sugar free. I wasn't sure right from the get-go how these would turn out, and it didn't help matters that I forgot to set a timer and thought I'd for sure burned them when I realized they'd been in for half an hour. But in the end, these turned out SO well. I'm even going to be bold and say that they might be the best (vegan, gluten free) cookies I've ever made! They're crunchy on the outside, and oh so delicious and chewy on the inside.


Pumpkin Oatmeal Chocolate Chip Cookies

Ingredients

1 1/2 cup all purpose gluten free flour
1/2 tsp baking soda
1/2 tsp baking powder
1/2 tsp cinnamon
1/2 tsp nutmeg
1/4 tsp ginger powder
1/4 tsp allspice
1 flax egg (1 tbsp ground flax + 3 tbsp hot water)
2 tbsp coconut oil
1/2 cup pumpkin puree
1/3 cup brown rice syrup
1/3 cup maple syrup
1 tsp vanilla extract
1 cup gluten free rolled oats
1/3 cup dark chocolate chips (optional, but delicious)


Directions

  1. Preheat oven to 350F.
  2. Start by making the flax egg, by combining freshly ground flax with hot water. Allow this to sit for a few minutes while you combine the dry ingredients. I made the "egg" in the large mixing bowl to avoid dirtying an extra bowl.
  3. In a medium sized bowl, mix together the dry ingredients.
  4. In a large mixing bowl, beat together the coconut oil and flax egg. My coconut oil wasn't melted so it doesn't matter if yours is or not.
  5. Mix in remaining wet ingredients.
  6. Slowly add dry ingredients to wet, and beat until a smooth texture is reached.
  7. Fold in oats and chocolate chips.
  8. Spoon dough onto a baking sheet lined with parchment paper. They won't spread too much, so they only need to be an inch or so apart. 
  9. Bake for about 20-30 minutes, or until golden brown on top. The longer you leave them the crunchier they will be, so cooking time is up to your personal taste.


Notes

This was my first time baking with brown rice syrup, and I loved how crunchy it turned the cookies on the outside while keeping them moist and chewy on the inside. Brown rice syrup can be found at a health food store near the other sweeteners. If you're not worried about these being vegan, feel free to use honey instead.

My batch probably would have made 13 or 14 cookies, but I ended up eating the remaining batter once I had 12 cookies on my sheet. You could of course do the same (it was delicious, and egg-free so ok to eat raw), or if you have a large baking sheet you might be able to make your cookies a bit bigger.


I hope you are enjoying this pumpkin season as much as I am! Let me know how these turn out for you in the comments below, or over on Facebook!


Friday, 4 October 2013

Pumpkin 101


Well, ladies and gentlemen, it's that time of year - pumpkin season! I am so in love with pumpkins in all their versatile glory. This wonderful winter squash can be used in so many ways. There's pumpkin pie, pumpkin smoothies, pumpkin pie, the list goes on! Even the seeds can be roasted and enjoyed as a delicious crunchy treat.

Did you know that aside from pumpkins being delicious they are also incredibly good for you? High in fibre, vitamins A, C and E, iron, potassium and antioxidant beta-carotene, pumpkins and their seeds boast a variety of health benefits.

How to Roast a Pumpkin


If you're planning on roasting your own pumpkin, you'll need to start with the right kind. Ignore the big field pumpkins you see outside the grocery store - these are great for jack-o'-lanterns but not much else. You'll want to look for a Sugar Pumpkin, which is much smaller, and much tastier. Look for a pumpkin that is heavy for it's size.

When you've picked the perfect pumpkin, the first step is to slice it in half. This can take a bit of upper body strength, so be prepared to use your muscles!

Once halved, scoop out the seeds and stringy core until the inside is free of any stringy flesh.


Preheat your oven to about 400F, and place pumpkin halves cut side down on a lightly oiled baking sheet. I line mine with tinfoil prior to baking to make for easy clean up.

Bake for about 45 mins to an hour or until a fork can easily pierce the pumpkin's skin.

Remove from the oven and let cool slightly before eating, or using to make homemade pumpkin puree...

How to Make Your Own Pumpkin Puree

Although the canned variety of pumpkin puree can be found year round, nothing beats a freshly roasted pumpkin straight out of the oven. Making homemade pumpkin puree is so simple once you've roasted your sugar pumpkin.

Simply scoop out the flesh, discarding the skins, and blend in a food processor or blender until smooth.


Pumpkin puree can be stored in a sealed container in the fridge for about a week, or in the freezer to enjoy year round! 

How to Roast Perfect Pumpkin Seeds

Roasted pumpkin seeds make for a delicious, healthy treat, and they're super easy to make. I usually toss the seeds in olive oil and sprinkle a bit of herbamare or sea salt prior to roasting, but the flavour possibilities are endless!

Once you've halved your pumpkin, you'll need to separate the seeds from the stringy bits of flesh. There's not really anything you can do with the leftover pumpkin flesh, so that can head right for the compost.

Rinse the seeds, and place in a pot filled with salted water - about 1/2 to 1 tsp for a medium pot.

Bring the water and seeds to a boil, and reduce slightly to a simmer for 10 minutes (uncovered).

Drain the seeds and dry slightly with a clean tea towel or paper towel (they might stick a little bit, but just use your fingers to get them off the towel).

Next, place on a baking sheet and massage with a small amount (1/2 tsp or so) of extra virgin olive oil and seasoning of your choice (sprinkling them with a bit of fine grain salt is always simple and delicious).

Lay out the seeds in a single layer, and bake for about 18-20 minutes, stirring once about halfway through.

In the last few minutes of cooking remove a couple seeds, let cool and have a taste. You want your seeds to be crunchy, and the inner seed should be slightly golden but not brown. When done, remove seeds, let cool slightly, and enjoy!


Roasted pumpkin seeds can be eaten whole, or by cracking open to eat the inner seed.

I hope you enjoy this pumpkin season as much as I already am! Please feel free to share your favourite pumpkin recipes in the comments below, and keep your eye out for my Pumpkin Spice Muffin recipe coming soon!

Thursday, 26 September 2013

Hearty Gluten Free Vegan Pancakes


Who doesn't enjoy waking up to the sweet smell of pancakes wafting from the kitchen on a cool fall morning? There's nothing quite like a warm breakfast to set you up for the day ahead. This isn't an every day breakfast for me, but it's definitely a welcome treat when I do make them. The best part is there's very little to clean up as it's all made in the blender!

First thing each morning I try to drink about a litre of water and have a bit of fruit to get things moving. These babies would be amazing following a crisp, juicy organic apple. I use sorghum flour, but an all purpose gluten free flour would work well too (or regular old whole wheat flour if that's what you're into). The trick with these being gluten free is to let the batter sit a bit to let things thicken up, or your might have a bit of trouble flipping the first few. Feel free to be creative and add sliced bananas or frozen blueberries when you throw them on the griddle. Also, the toppings are endless, from simple maple syrup to berries, nut butters, jam, you name it!


Ingredients


  • 2 tbsp whole flax seeds
  • 1 1/2 cup water (or non dairy milk of your choice)
  • 3/4 cup sorghum flour
  • 2 tsp baking powder
  • 1/2 tsp baking soda
  • 1/2 cup oats (make sure they're certified gluten free if you're sensitive to gluten)
  • 1 ripe banana
  • 1 tsp cinnamon
  • 1 tsp vanilla extract
  • 2 tbsp coconut
  • 2 tbsp sunflower seeds
  • 1 tbsp coconut oil


Directions

Grind flax seeds in blender, and add water or milk. Blend on medium speed until well combined and let stand in blender.
Add remaining ingredients.
Blend on med/high for about 30 seconds.
Let batter sit for 5-10 minutes to allow it to thicken.
Heat griddle or frying pan to low-med heat and melt enough coconut oil to lightly cover surface.
Pour pancake mix from blender onto heated pan. Flip after a minute or two, or when bubbles form on the surface.
Makes about 10 medium sized pancakes.


Enjoy!

Thursday, 19 September 2013

How to Improve Your Relationship with Food


Do you happen to find yourself in an unhealthy relationship with the food you're eating? It's not uncommon to use food as a way to mask things we may not want to focus on, or to fulfill us emotionally when certain areas of our lives are unbalanced. Read on for my suggestions to help get you back on track.


Eat Only When You’re Hungry


We’ve all done it – opened the door of the fridge and stood there, unsure what we want but sure that we want something. Often these ambiguous cravings are a cry for water. Instead of peering longingly into the fridge, drink a glass of water or go for a walk. Wait a few minutes after that and see if you still want to eat. If you do, then go for it! Just pay attention to what you’re eating and why. If it’s to satisfy something unrelated to hunger or to provide a distraction from something else, try to recognize what that might be and think of different activities besides eating that might be healthier for you. Think about things like your personal relationships, the fulfillment you're getting at work, and your stress levels. Many factors can contribute to emotional eating, and identifying what that might be is the first step in making the necessary changes.

Make Mealtime Special


How we eat is just as important as what we eat. Ever notice that when you eat while you’re rushed or stressed you tend to overeat and your digestion isn’t quite as good? It’s so common in our fast paced culture of drive ins and never ending to-do lists that we don’t give ourselves much time to nourish ourselves. Try this: for at least one meal this week, set aside at least half an hour with no distractions to enjoy the food you’re feeding yourself. When we eat we go into absorption mode. That means not only are we absorbing the nutrients in the food, but also our environment. If you turn off the tv, put your phone down, step away from your desk and enjoy your food with all your senses you might find you are much more satisfied and more nourished from your meal.

Keep a Food Journal


Writing down everything you eat in a day will not only keep you accountable for what you’re putting in your body, but is also a great tool to allow you to pinpoint any food sensitivities or triggers for health concerns like headaches or low energy. Try it out for one week! Write down what you ate, how you felt right away, and how you felt about an hour or two after. Often when we eat junk food we feel awesome right off the bat, but not long after we start to feel sluggish and unfocused. Don't worry about tracking calories or grams of fat, etc., but write out whatever it was, in whatever detail you're comfortable with. Instead of thinking of food journaling as a chore, start to recognize it as a way to connect with yourself and be more in tune with your body.


Good luck on your health journey, and as always please leave a comment and let me know how you're doing!


Thursday, 12 September 2013

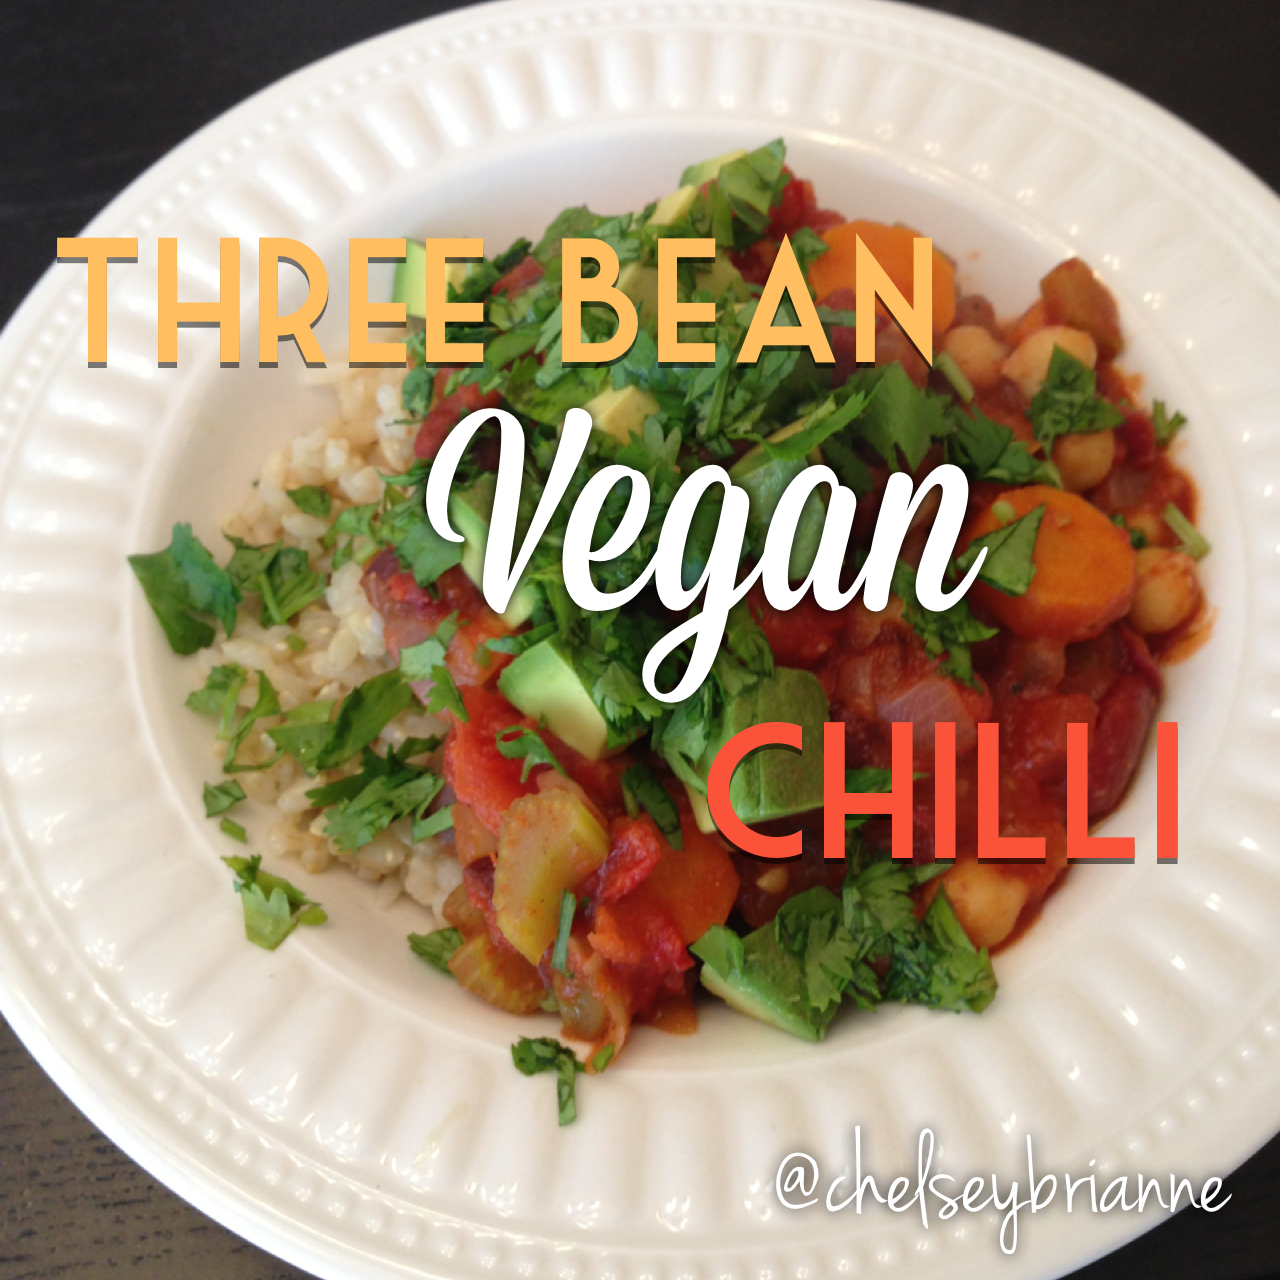
Three Bean Vegan Chilli


This recipe caught my eye when I recently saw it on MindBody Green (one of my go-to websites for recipes and holistic health and yoga), so I whipped up a batch and put my own spin on it based on what I had in the kitchen and this deliciousness was the result! It's perfect for a cool fall day - or whenever, really - and is easy to freeze and reheat if you don’t eat it all at once. It makes a fair amount - probably enough to serve 4-5 people. I made sure to set aside some smaller portions to throw in the freezer so I don’t have to thaw the entire batch just to enjoy a little bit.


Here's what you'll need:

Ingredients


Chilli

  • 1 large white onion, diced
  • 3 carrots, peeled and diced (about 1.5 cups)
  • 2 celery sticks, chopped
  • 2-3 garlic cloves, minced
  • 2 cups cooked black beans (or 16 oz canned, drained & rinsed) *
  • 2 cups cooked kidney beans (or 16 oz canned, drained & rinsed) *
  • 2 cups cooked chickpeas (or 16 oz canned, drained & rinsed) *
  • 7 roma tomatoes, chopped
  • 1 small can tomato paste (6 oz or 156 ml, about 1/2 cup)
  • 1 tbsp olive oil
  • 1.5 tbsp cumin
  • 1.5 tbsp dried oregano
  • 1/2 tsp cayenne pepper
  • 2 bay leaves (optional) **
  • salt and pepper to taste

Garnish

  • 1 avocado
  • 1-2 limes, juiced
  • 1/2 cup cilantro, chopped

Directions


Heat large pot on med heat and add oil.
Add onion, carrots, celery, garlic and sauté until fragrant and onions start to turn opaque.
Add remaining chilli ingredients and simmer for about 20 minutes.
Remove bay leaves and serve topped with avocado, fresh lime juice and cilantro.
Enjoy!

Notes

* See my post about cooking dried beans here
** If using bay leaves, it can be helpful to tie them in a piece of cheesecloth to easily remove prior to serving.


As always, thanks so much for reading! Let me know how this turns out for you :)
Lots of love and light
Xoxo